If you want great results with agricultural spraying, you need to follow these seven steps. You can boost your success, lower your risks, and stay on the right side of the law. These tips come from experts, so both new and experienced applicators can trust them. Think of this guide as a handy checklist you can use every time you spray. Agricultural spraying works best when you pay attention to every detail.
Key Takeaways
Always read the product label first to follow safety rules and use the right methods.
Clean your sprayer thoroughly after each use to avoid damage and get better results.
Choose the right nozzle and calibrate your sprayer to apply the correct amount of product.
Spray at the right time by checking crop and weed stages for the best control.
Watch the weather closely to avoid drift and protect your crops and the environment.
Read the Label
It can be easy to skip reading the label, but that is not smart. The label gives you the rules for safe and good agricultural spraying. The label helps you do the job the right way. It tells you how to use each herbicide, pesticide, or tank mix. You will find information about timing, equipment, and safety. If you want to avoid problems, always read the label first.
Application Methods
The label shows you how to use each product. You will see steps for spray volume, nozzle type, and pressure. Some herbicide labels tell you to use a certain droplet size. Others warn you about drift or off-target movement. For example, dicamba spraying has strict rules you must follow. These rules protect your crops and your neighbors’ fields. If you do not follow the label, you might get bad results or cause damage.
Tip: Always check the label before you spray. Even if you used the product last year, the label might be different now.
Safety and Restrictions
Labels help keep you safe. They list personal protective equipment (PPE) like gloves, goggles, or coveralls. You will see re-entry intervals and pre-harvest intervals. These tell you when it is safe to go back in the field or harvest the crop. Labels also explain buffer zones and restricted areas. Some pesticide labels say not to spray near water or sensitive crops. If you use a herbicide, always look for special rules. Following these steps keeps you legal and safe.
Always read the label before you spray.
Follow all directions for each herbicide and pesticide.
Keep a copy of the label with your records.
Clean the Sprayer
Keeping your sprayer clean is one of the smartest things you can do. If you skip this step, you risk damaging your crops or wasting your spray. A clean sprayer helps you get the best results every time.
Tank and Lines
Start with the tank. After each use, empty it completely. Rinse the tank with clean water. Swirl the water around to loosen any leftover product. Drain it again. You might need to repeat this step if you see any residue.
Next, focus on the lines. Fill the tank with fresh water. Run the water through the hoses and boom lines. This flushes out any chemicals hiding inside. Some products can stick to the inside of the lines. If you leave them there, they can mix with your next spray and cause problems.
Tip: Use a tank cleaner if you switch between different products. This helps remove stubborn residues and keeps your equipment in top shape.
Nozzles and Filters
Nozzles and filters need special attention. Remove the nozzles from the boom. Soak them in warm, soapy water. Use a soft brush to clean out any clogs. Never use metal objects to poke the nozzles. You could damage them and ruin your spray pattern.
Check the filters, too. Take them out and rinse them under running water. Look for any debris or buildup. Clean filters help keep the spray even and prevent blockages.
A clean sprayer means fewer headaches and better results. Make cleaning part of your routine, and you will see the difference in your fields.
Equipment Setup
Getting your equipment ready is a big step in spraying success. If you want your herbicide to work well, you need to pay close attention to your sprayer setup. The right choices here can make or break your results.
Nozzle Selection
Nozzles control how your spray lands on the target. If you pick the wrong nozzle, you might waste herbicide or miss weeds. Each nozzle type gives you a different droplet size and spray pattern. Some nozzles work better for contact herbicides, while others suit systemic products. Always check the label for nozzle recommendations. You may see advice about droplet size or pressure.
Tip: Use a chart or table from your nozzle manufacturer. This helps you match the right nozzle to your sprayer speed and pressure.
Here’s a quick table to help you think about nozzle choices:
Nozzle Type | Best For | Droplet Size |
Flat-fan | Herbicide coverage | Medium-Fine |
Air-induction | Drift control | Coarse |
Flood | Soil-applied | Very Coarse |
Choosing the right nozzle helps you get even coverage and boosts herbicide performance.
Calibration
Calibration means checking if your sprayer puts out the right amount of product. If you skip this step, you might use the wrong herbicide rates. Too much can hurt your crop. Too little lets weeds survive. You want your sprayer to match the label rate every time.
Measure how much water your sprayer puts out in one minute.
Check your speed and pressure.
Adjust your settings until you hit the target rate.
Always calibrate before you start a new field or switch herbicides.
When you calibrate, you save money and protect your crops. You also make sure your herbicide does its job.
Timing Matters
Getting the timing right can make or break your spray job. If you want the best weed control, you need to pay attention to when you spray. Timing affects how well your herbicide works and helps you avoid problems like herbicide resistance.
Crop Stage
You should always check the crop stage before you spray. Young crops can be sensitive to some herbicides. Spraying too early or too late can hurt your plants or lower your yield. Most labels tell you the best time for spraying. For example, some herbicides work best when the crop has just a few leaves. Others need the crop to be a bit bigger.
Tip: Walk your fields before you spray. Look at your crop and decide if it is at the right stage for spraying.
If you spray at the right time, you protect your crop and get better weed control. You also lower the risk of hurting your plants.
Weed and Pest Growth
Weeds grow fast. If you wait too long, they get big and hard to control. Small weeds are easier to kill with herbicide. You should target weeds when they are young and tender. This gives you the best shot at weed control and helps stop herbicide resistance from building up.
Here’s a quick table to help you remember:
Weed Size | Best Action |
Small (1-3") | Spray for best kill |
Medium (4-6") | Spray, but control drops |
Large (7"+) | Hard to control, may survive |
If you see weeds getting bigger, act fast. Don’t let them set seed. Each weed that survives can make weed control harder next year. You also help slow down herbicide resistance by not letting tough weeds survive.
Remember: The right timing means better weed control, healthier crops, and less trouble with herbicide resistance.
Adjuvants and Tank Mixes
Adjuvants and tank mixes can make your spray job work better. You might see better weed control or less drift. But you need to know how to use them the right way. If you mix the wrong products, you could clog your sprayer or hurt your crops. Let’s break it down.
Product Compatibility
You want your spray mix to work together, not fight each other. Some products just don’t mix well. They can form clumps, settle out, or even cause crop injury. Always check the label for compatibility notes. Many companies also offer compatibility charts or online tools. These help you see if your herbicide, insecticide, fungicide, and adjuvant will play nice.
Tip: Do a jar test before you fill your sprayer. Take a clear jar, add water, and mix small amounts of each product in the same order you plan to use. Shake it up. If you see clumps or layers, don’t use that mix.
Here’s a quick checklist for checking compatibility:
Mixing Order
Mixing order matters a lot. If you add products in the wrong order, you might get sludge or foam. That can plug your nozzles or make your spray uneven. Most labels give you a mixing order. If not, follow this general rule:
Step | What to Add | Example Products |
1 | Water (half tank) | Clean water |
2 | Dry products | Wettable powders |
3 | Liquid flowables | Suspension concentrates |
4 | Emulsifiable liquids | EC formulations |
5 | Adjuvants | Surfactants, oils |
6 | Fill with water | Top off the tank |
Note: Always keep the agitator running while you add products. This helps everything mix well.
If you follow the right order, you get a smooth mix and a better spray job. Take your time and double-check each step. Your crops will thank you!
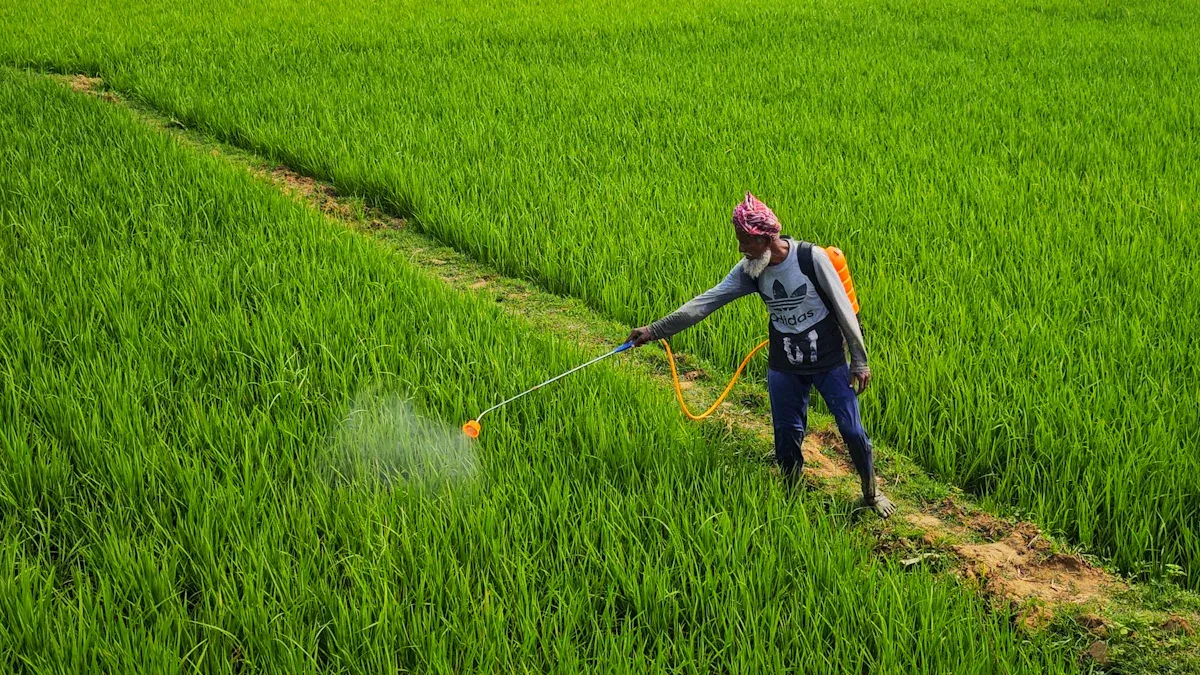
Weather Awareness
Weather can make or break your spray job. If you want the best results from agricultural spraying, you need to watch the weather before you start. Weather affects how your spray lands, how well it works, and how safe it is for the environment.
Wind and Drift
Wind can move your spray away from the target. If you spray when it is too windy, you might miss the weeds and waste your product. Drift can also hurt nearby crops, gardens, or even water sources. Always check the wind speed before you spray. Most labels tell you the safe wind range for agricultural spraying. A wind speed of 3 to 10 mph is usually best.
Tip: Spray early in the morning or late in the afternoon when the wind is calm.
You should also watch for buffer zones. These are areas you must leave unsprayed to protect sensitive crops, homes, or water. Buffer zones help keep your spray where it belongs and protect the environment.
Temperature and Inversions
Temperature matters, too. Hot days can make your spray dry up before it hits the weed. Cold days can slow down how well the product works. Humidity also plays a role. Low humidity can cause droplets to evaporate fast, which means less weed control.
One big risk is a temperature inversion. This happens when cool air gets trapped near the ground under warm air. Spray droplets can float and move far from your field. You might not see it, but your spray could land on someone else’s crops or in a creek.
Here’s a quick checklist to help you:
Check wind speed and direction.
Watch for temperature inversions (look for fog, smoke, or dust hanging low).
Spray when humidity is moderate.
Respect buffer zones.
Remember: Good weather awareness means better weed control and safer fields for everyone.
Record Keeping
Keeping good records helps you become a better applicator. You can spot problems, improve your results, and show that you follow the rules. Let’s look at how you can make record keeping work for you.
Application Logs
You should write down every spray job you do. This log helps you remember what worked and what did not. It also helps if you need to answer questions later. Here are some things you should include in your log:
Date and time of application
Field location or name
Crop and growth stage
Product names and rates
Amount of water used
Weather conditions (wind, temperature, humidity)
Equipment settings (nozzle type, pressure, speed)
Name of the person who applied the spray
Tip: Use a notebook, a phone app, or a printed form. Pick what works best for you. Just make sure you fill it out every time.
A good log can help you track which pesticide worked best. You can also use it to plan your next spray.
Compliance
You need to keep records to follow the law. Many states and the EPA require you to keep records for Restricted Use Products. These rules help protect you, your neighbors, and the environment. If someone asks about your spray job, you can show your records.
Here’s a quick table to help you remember what to keep and for how long:
Record Type | How Long to Keep |
Application logs | 2-3 years |
Product labels | As long as used |
Calibration records | 2-3 years |
Remember: Good records keep you safe, legal, and ready for any questions.
Seven Steps for Agricultural Spraying Success
Review and Checklist
You have learned a lot about spraying. Now, let’s pull it all together. If you want a successful application every time, you need a simple checklist. This helps you remember each step and keeps your spray job on track.
Here’s a handy checklist you can use before every spray job:
Read the label
Check for updates. Look for rules about timing, safety, and equipment.
Clean the sprayer
Rinse the tank, flush the lines, and clean nozzles and filters.
Set up your equipment
Pick the right nozzle. Calibrate your sprayer for the correct rate.
Check the timing
Look at your crop stage. Target weeds and pests when they are small.
Mix products safely
Check compatibility. Follow the right mixing order.
Watch the weather
Measure wind speed. Avoid spraying during temperature inversions. Respect buffer zones.
Keep good records
Write down what you did, when, and how. Save your logs for future reference.
Tip: Print this checklist and keep it in your sprayer cab. You can check off each step as you go.
Here’s a quick table for a visual reminder:
Step | What to Check |
Label | Rules and updates |
Sprayer Cleanliness | No residue or clogs |
Equipment | Nozzle and calibration |
Timing | Crop and weed stage |
Mixing | Compatibility and order |
Weather | Wind, temperature, humidity |
Records | Logs and compliance |
Stay focused on these steps. You will see better results, safer fields, and more confidence in your work.
You hold the key to safe and effective spraying when you follow these seven steps. Make this checklist your go-to guide for every application. Careful attention and good records help you grow healthy crops and protect your land for years to come.
Tip: If you ever have questions, reach out to local experts or trusted resources. You never have to do it alone!
FAQ
How often should you calibrate your sprayer?
You should calibrate your sprayer before every new job or when you change products. This helps you get the right rate and avoid mistakes. Calibration keeps your spray even and your results strong.
What is a temperature inversion, and why does it matter?
A temperature inversion happens when cool air sits under warm air. Spray droplets can float and drift far away. You want to avoid spraying during an inversion to keep your product on target and protect nearby fields.
Can you mix any two products together in the tank?
No, not all products mix well. Some can clump or cause damage. Always check the label and do a jar test first. This helps you avoid problems and keeps your spray smooth.
Why do you need to keep spray records?
Records help you track what you did and show you followed the rules. Good records make it easy to answer questions from neighbors or inspectors. They also help you plan better for next time.
What should you do if it starts to get windy during spraying?
Stop spraying if the wind picks up too much. High wind can cause drift and waste your product. Wait for calmer weather to finish the job. This keeps your spray where you want it.