You want your garden sprayer to work well each time, right? If you clean your sprayer after every use, you stop chemicals from building up. This helps the spray come out evenly. SeeSa has many sprayers, so you can find the right one for your garden. Cleaning your sprayer often makes it last longer. It also stops it from getting damaged. Here is how taking care of your sprayer helps it work better:
Maintenance Aspect | Impact on Effectiveness and Lifespan |
Removal of chemical residues | Stops nozzles and hoses from clogging. This keeps the spray even and helps you use chemicals the right way. |
Inspection for wear and damage | Finding cracks, leaks, or worn parts early lets you fix them fast. This keeps your sprayer working well and stops problems. |
Cleaning filters and securing connections | Keeps your sprayer working its best by stopping blockages and leaks. |
Proper cleaning before storage | Emptying out liquids stops rust. This keeps your sprayer safe and helps it last longer. |
Storage conditions | Keeping your sprayer in a dry, covered place that is not too hot or cold stops damage. This helps it last longer. |
Cleaning your garden sprayer is fast and easy if you follow these steps. You make things safer, help your plants, and keep your sprayer ready to use.
Key Takeaways
Wash your garden sprayer after each use. This stops chemicals from building up. It helps your sprayer work well.
Put on safety gear like gloves and goggles. This keeps you safe when you clean your sprayer.
Try the triple rinse method to get rid of most chemical leftovers. This helps keep your plants safe.
Be careful with leftover chemicals and rinse water. This helps protect nature and follows disposal rules.
Check your sprayer, add lubricant, and store it the right way. This makes your sprayer last longer and keeps it ready to use.
Prep & Safety
Garden Sprayer Prep
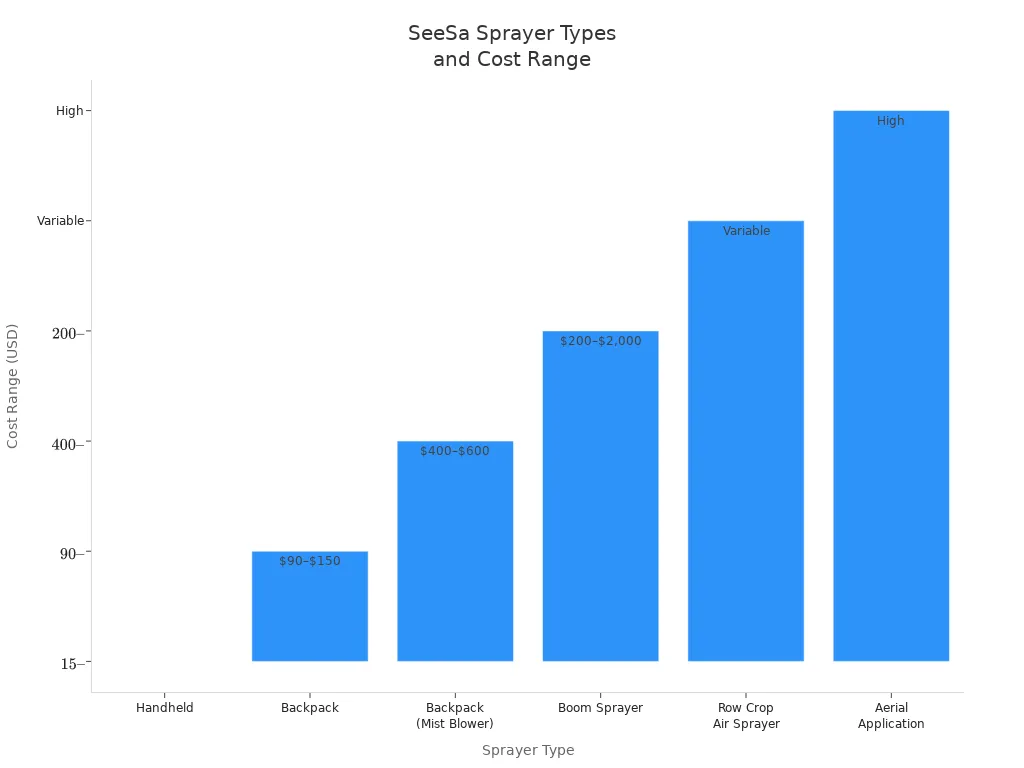
Before you start cleaning, you need to get your garden sprayer ready. SeeSa offers many types of sprayers, from small handheld models to large wheelbarrow and electric sprayers. Each type needs a little different prep. For example, a manual sprayer might just need a quick rinse, while a wheelbarrow sprayer could need more steps. Here’s a quick look at the different sprayer types and what they’re best for:
Sprayer Type | Size Range | Pressure Control | Speed Control | Cost Range | Typical Use |
Handheld | 1–3 gallons | Variable | Variable | $15–$100 | Spot treatments, small areas |
Backpack | 3–5 gallons | Variable | Variable | $90–$150 | Spot treatments, small areas |
Backpack (Mist Blower) | 2–3 gallons | Not applicable | Variable | $400–$600 | Small to medium acreage |
Boom Sprayer | 25–300 gallons | Constant | Constant | $200–$2,000 | Small to large acreage |
Row Crop Air Sprayer | Variable | Variable | Variable | Variable | Multiple rows, air-assisted |
Aerial Application | Large scale | Variable | Variable | High | Large fields, aerial spraying |
You should always empty your garden sprayer and rinse out any leftover chemicals. For bigger sprayers, like wheelbarrow or boom sprayers, make sure to brush away dirt and rinse with a hose. Let everything dry before you put it away.
Protective Gear
Safety comes first when you clean your garden sprayer. Chemicals can be harmful, so you need to protect yourself. Here’s what you should wear:
Long-sleeved shirt and long pants
Socks and closed-toe shoes or boots
Chemical-resistant gloves (like nitrile)
Splash-resistant goggles or a face shield
Waterproof hat or headgear
Mask or respirator if the label says you need one
Tip: Always wash your gloves before taking them off, and keep your safety gear clean and ready for next time.
Read Instructions
Every garden sprayer and chemical is a little different. Always check the instructions from SeeSa and the product label before you start. The label tells you how to clean the sprayer and what cleaning agents to use. Follow these steps:
Read the product label for cleaning directions.
Wear the right protective gear.
Empty and rinse the sprayer right after use.
Take apart nozzles and filters for a deep clean.
Use the cleaning agents listed on the label.
Make sure everything is dry before storing.
If you follow these steps, you keep your garden sprayer working well and keep yourself safe.
Best Way to Clean
Drain & Rinse
You want to start with the basics. The best way to clean your garden sprayer is to drain and rinse it right after you finish spraying. This step helps remove most of the chemical residue before it dries or settles. Here’s a simple cleaning procedure you can follow:
Take your sprayer to the field or a safe area.
Empty any leftover liquid from the tank.
Fill the tank with fresh water, using about 10% of its capacity.
Shake or agitate the water inside the tank.
Spray the water through the nozzle to flush out the system.
Drain the water completely.
SeeSa sprayers make this step easier. Many models have removable filters and easy-access tanks, so you can clean out the tank quickly. If you clean promptly, you stop chemicals from sticking to the inside.
Tip: Always perform this cleaning procedure as soon as you finish spraying. Waiting too long makes it harder to remove residues.
Soap or Detergent
Sometimes water alone isn’t enough. If you notice sticky or oily residues, use a mild cleaning solution like dish soap or a gentle detergent. Fill the tank halfway with water, add the cleaning solution, and agitate well. Spray some of this mixture through the nozzle to clean the lines. Let it sit for a few minutes, then drain and rinse with clean water.
SeeSa’s advanced sprayer designs let you fill the machine with water and spray it out, which helps distribute the cleaning solution throughout the system. This method works for manual, electric, and wheelbarrow sprayers.
Note: Never use bleach. Bleach can damage seals and rubber parts inside your sprayer. It’s harsh and can cause leaks or breakdowns over time.
Triple Rinse Method
Triple rinsing is the best way to clean your sprayer after using herbicides or pesticides. This cleaning procedure removes almost all chemical residues and keeps your plants safe. Here’s how you do it:
First rinse: Fill the tank with fresh water (about 10% of the tank’s size), agitate, and spray out the water.
Second rinse: Repeat the process with clean water, making sure to flush hoses, pumps, and nozzles.
Third rinse: Fill the tank again, agitate, and spray until only pure water comes out.
Each rinse removes more residue. The first rinse gets rid of most chemicals. The second rinse clears out leftovers. The third rinse makes sure your sprayer is safe for the next use. Triple rinsing is a cleaning procedure recommended by experts and helps prevent crop injury.
Tip: Always rinse in the field if possible. This keeps chemicals away from drains and water sources.
Ammonia & Vinegar Options
Some chemicals need extra help to break down. If you use herbicides or pesticides that leave tough residues, try ammonia or vinegar as your cleaning solution. Add a small amount to water in the tank, agitate, and spray through the system. Ammonia works well for many herbicides. Vinegar helps with mineral deposits. Always check the chemical label to make sure these options are safe for your sprayer.
SeeSa sprayers handle these cleaning solutions well, thanks to their durable materials and smart design. You can easily remove the battery or filters to make cleaning even simpler.
Callout: Never mix cleaning solutions unless the label says it’s safe. Some chemicals react and can cause damage or release harmful fumes.
Clean Nozzles & Filters
Nozzles and filters need special attention. If you want the best way to clean these parts, follow these steps:
Remove the nozzle from the spray wand.
Soak it in warm water for several minutes.
Use a soft brush to scrub away debris.
Blow compressed air through the nozzle to clear blockages.
Clean filters separately in clean water, using a brush if needed.
Reassemble and test for even water flow.
SeeSa sprayers feature removable filters in both the switch and tank. You can wash them directly with water, which makes the cleaning procedure faster. Clean nozzles and filters after every use to prevent clogging and keep your sprayer working its best.
Tip: Dry all parts completely before you store your sprayer. This stops mold and corrosion.
If you properly clean your sprayer every time, you protect your equipment and your plants. Use the best way to clean for your sprayer type, and always choose the right cleaning solution for the job. Clean out the tank, rinse well, and pay attention to nozzles and filters. Triple rinsing and regular cleaning keep your SeeSa sprayer ready for action.
Disposal & Environment
Chemical Disposal
You want to keep your garden safe and protect the environment. When you finish spraying, you might have leftover chemicals. Here’s how you can handle them the right way:
Only mix what you need. This helps you avoid extra waste.
Always read the label on your chemical bottle. The label tells you how to get rid of leftovers.
Triple-rinse empty containers. Fill them with water, shake well, and pour the rinse water back into your sprayer or onto the treated area.
Never pour chemicals or rinse water down the drain, toilet, or in the trash.
Puncture empty, rinsed containers so no one can reuse them.
Recycle containers if your local program allows it. If not, follow the label for safe disposal.
Take leftover chemicals to a local hazardous waste collection event or use a professional service.
Tip: You can also share unused chemicals with neighbors or local gardeners to cut down on waste.
Rinse Water Management
Rinse water from your sprayer can harm plants and water if you do not manage it well. Here’s what you should do:
Always add rinse water back into your sprayer tank and use it on the area you just treated.
Never let rinse water run into storm drains, gutters, or streams.
Rinse your sprayer and containers three times. Each time, pour the rinse water into the sprayer tank.
For big sprayers, use special tools like pressure rinse nozzles to clean them well.
If you have extra diluted chemicals or rinse water, take them to a hazardous waste facility.
Note: Do not spray before rain. Rain can wash chemicals into waterways.
Protect Plants & Waterways
Improper disposal can hurt your garden and local streams. Chemicals in drains or soil can pollute water and harm wildlife. You can help by:
Only buy and mix what you need.
Use spot treatments to limit chemical use.
Avoid spraying before rain or watering.
Never dump rinse water on the ground or in drains.
Follow all label and local rules for disposal.
SeeSa cares about the environment. Many SeeSa sprayers use eco-friendly materials like polypropylene and have features that make cleaning and safe disposal easier. When you use your SeeSa sprayer the right way, you help protect your plants, your family, and your community.
Maintenance & Storage
Inspect & Repair
You want your sprayer to last a long time and work every time you need it. Start with regular sprayer maintenance. Check your garden pressure sprayer before and after each use. Look for leaks, worn hoses, or loose parts. If you see any cracks or damage, fix them right away. Chemical build-up and clogged filters are common problems. These can make your sprayer less effective and even cause it to break. Clean filters often and make sure all connections are tight. Release any leftover pressure after spraying. This step protects soft parts like o-rings and hoses from damage.
Tip: Secure your sprayer during transport. This stops bumps and shakes from causing leaks or other problems.
Lubricate Parts
Keep your sprayer running smoothly by adding a little lubricant to moving parts. Spray a rust solvent or a product like WD-40 into the water inlet and gun. Grease o-rings and connection points. This simple step helps prevent wear and keeps everything working well. Lubrication is a key part of sprayer maintenance and helps your equipment last longer.
Store Garden Pressure Sprayer
Proper storage is just as important as cleaning and upkeep. After you clean your sprayer, drain all water from the tank, hose, and nozzles. Unroll the hose and let it dry on a slope. Store your sprayer out of direct sunlight and away from freezing temperatures. Lay the machine on its back with the water inlet facing up. This keeps water from getting trapped and causing rust or cracks. Always keep your sprayer in a dry, covered spot.
Clean Your Sprayer After Use
Routine cleaning is the best way to keep your sprayer in top shape. Clean your sprayer after every use. Rinse the tank, spray out any leftover solution, and wash nozzles and filters with mild detergent. Avoid harsh tools that can scratch or damage parts. Regular cleaning stops chemical build-up, prevents cross-contamination, and keeps your sprayer working like new. Following these sprayer maintenance steps means fewer repairs and better results every time you spray.
Remember: Clean sprayers last longer and help protect your plants, your family, and the environment.
You can keep your garden sprayer in top shape by following these simple steps:
Drain and rinse your sprayer after each use.
Clean the tank with water and mild detergent.
Spray the cleaning mix through the nozzle.
Wash nozzles, screens, and filters.
Rinse everything again with clean water.
Store your sprayer in a dry place.
Regular cleaning protects your health, keeps your plants safe, and helps the environment. SeeSa sprayers make this routine easy and reliable. Take care of your sprayer, and you’ll see better results every season!
FAQ
How often should you clean your garden sprayer?
You should clean your sprayer after every use. This keeps it working well and stops chemicals from building up. Regular cleaning also helps your sprayer last longer.
Can you use vinegar to clean your sprayer?
Yes, you can use vinegar to remove mineral deposits. Just mix a small amount with water, fill the tank, and spray it through. Always rinse with clean water after using vinegar.
What should you do if your sprayer nozzle gets clogged?
Take off the nozzle and soak it in warm water. Use a soft brush to clean away any debris. Blow air through the nozzle to clear it. Put it back on and test the spray.
Is it safe to store your sprayer with water inside?
No, you should always empty and dry your sprayer before storing it. Water left inside can cause rust or mold. Store your sprayer in a dry, covered place for best results.